Tuesday, 9 April 2013


How to maintain vendor prospects
After maintaining the charts of accounts we maintain the vendor records.
First we click the maintain button and click the vendor

The following window display.

General tab:
In general tab enter the vendor contact, Account no, address, city name and telephone no. etc...

 Purchase Default tab:
To set up different purchase transaction defaults for each vendor record, select the purchase default. And change this information at different transaction.
Purchase Rep:
You can enter the purchase representative that has contact with the vendor.
Purchase Account:
This relate to the chart of accounts ready established, in which we have to select account for vendor.
Ship via: if the goods are purchase foreign country.
Terms: we enter the purchase conditions impose by the vendor.
Delivery method:
These are two delivery methods.
Paper form: when we want to print form for the vendor.
E-mail: when we want to e-mail for the vendor.


Custom fields tab:
To enter custom field for selected vendor. Select the custom fields for maintain vendor window.
History tab:
In history tab we enter the information about the previous purchases
Last invoice Date: we enter the date when we receive purchases for vendor.
Last invoice amount:
And enter the amount of the last invoice.
Last payment Date:
We enter the date when we pay amount for creditor.
Last payment Amount:
And enter the amount of last payment.


Friday, 5 April 2013


How to maintain customer/prospects
After maintaining the charts of accounts we can maintain the customer records.
First we click the maintain button the list will appear and display following.

And then we click the customer/prospects the following window display


I
 General tab:
To enter the all information such as contact, address, telephone no, country and others.
Sales Defaults:
To set up different sales transaction defaults for each customer record, select the sales default. And change this information at different transactions.
Sales Rep:
You can enter the sales representative that has contact with the customer.
G/L Sales Account: 
This relate to the chart of account ready established, in which we have to select account for customer

Open P.O. #: Here you can enter Purchase Order Number 

Ship Via: This relate to foreigner users for send goods to another address


Resale #: If this customer purchases items for resale, enter the resale number here.


Pricing Level: We can choose from various pricing levels in percentage for sale purpose

Terms:Here we can Enter Terms that you company wants to impose on customer sale conditions.
    Delivery method: this option is useful for printing of form or sending E-mail to customer

    Paper form: This option will be useful when you want to print form for sending to the customer:

    E-Mail: This option can be used when company wants to send E-mail to the customer when forms are printed.

   2: CC Sales Rep: This is a check box option which enables software to send automatically an e-mail to the default customer when you send a form to customer. 


                                                                                          Payment Default Tab:

To set up customized receipt settings for each customer record select the payment Defaults tab in the maintain customer/prospects window.


Cardholder's Name: we can add name of customer that written on his/her Credit Card.


Address: we can add information about the customer’s billing address.

City, State, Zip: enter the customer city name and state.

Credit Card Number: Here we enter credit card number of its Customer.


Expiration Date: here we can add information about the expiration of credit card of customer.

Payment Method: Here company can select Payment Method for Receipt cash from its customer.


Customer Fields:
Here we enter the information about the customer.
History:

Customer Since: Here we can enter the date, when we make transaction of sale with your customer


Last Invoice Date: Here we enter the date when we sent invoice to your customer

Last Payment Date: here we can enter the date when you receive amount from your debtor.

Customer Default Information


We click the maintain button and then click the default information the list is appear we click the customers the following window display.


Payment terms tab:
In this we enter the all information about the payment of customer. Payment due in number of days or due on day of next month. Enter the information about the discount.
Account Aging:
In account aging the number of due days is selected. After the  due days the provision of doubtful debts increased. 


Customer fields tab:
In this tab we maintain the secondary record of the customers.


Finance charges:
In this the interest is selected if the customer is not pay within the due days. 


Wednesday, 20 March 2013


HOW TO CREATE CHARTS OF ACCOUNTS IN PEACH TREE ACCOUNTING SYSTEM
Chart of account is the list of accounts which is used to post the various transactions.
Why we want to maintain the chart of accounts
In first step to set up the new company we select the option of build up own company therefore we need to make the charts of account.

First we open the exits company in the Peach tree accounting and then click the maintain option the following window display
Click on the charts of accounts the following window display
First enter the Account ID and then press the tap key the cursor move to the next blank in which description is written and then press the tab key the cursor moves to the account type in which the account type is written.
And after write the all things press Alt+s to save the chart of account the cursor moves to the account ID.

The procedure to write charts of accounts so on.
How we can delete the account in the list of charts of accounts.
First we click the look up button to see the charts of accounts.

Show the charts of accounts
Select the account you want to delete and then click the delete button.
The conformation window display on the screen
If we want to delete the account click the yes and if you not want to click the no. The account will delete.
 After maintaining the charts of accounts we are able to enter the balances in the account we click the button of beginning balances to enter the beginning data

When we click the beginning balances the window of selected period open display following
Select the any one period which is suitable for your company and then click the OK.


Wednesday, 13 March 2013


Setup a new company

We will open the Peachtree software to setup a new Company.
Click on the start menu and then open the Peachtree accounting 2004.
Click on the setup a new company and then open the following window this is introductory window.

This window provides the introduction about the software. Read this information and then click on the next button.


Open the company introduction window display following
Write the company name ,address ,city ,country and other blanks on this window company name is must written on this window and then click the next button
Open the charts of accounts window display following
Select any one option which is suitable for company the five options is given on the window
First option is for the new retail, services, construction, Manufacturing, or Distribution Company using simplified chart of accounts.
Second option is for a new company using extensive chart of accounts
Third option is for the company not wants to make its own chart of accounts copy the existing Peachtree Accounting Company.
Forth option is for company convert from another accounting program.
Fifth option is for the company wants to build your own accounts.
And then click on the next button
Open the Accounting Method window display following

These are two types of accounting methods
Accrual in which income is recorded as your invoice customers
Cash is recorded when cash is received and expenses are recorded and expenses are recorded when paid.
Select any one and then click the next button


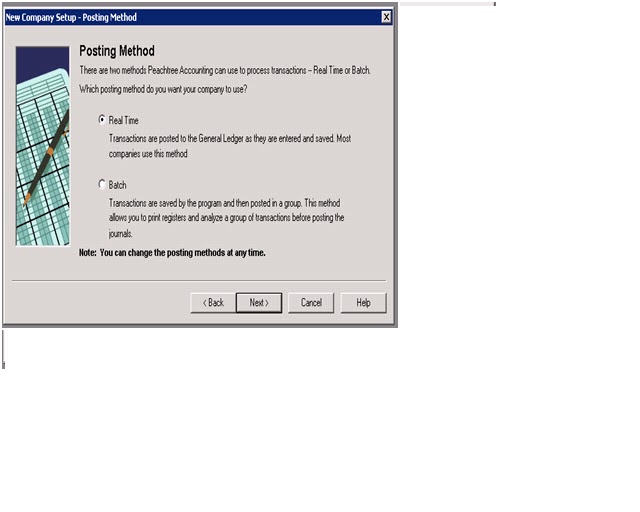
Open the window of posting method display following


These are two types of posting can use in Peachtree system first is real and time and second is batch
Real Time: Transaction are posted to the general ledger as they are entered are saved.
Batch: Transactions are saved by the program and the posted in a group.
Select any one option and then click the next button.
 Open the window of Accounting period display following

Accounting period is very important it describe the accounting period of the company .most companies use 12 months accounting period.
Select any one option and then click the next button
Open the window of monthly accounting periods display following:


 click the next button.
Open the default window display following:


Read the default window it about vendor information, inventory costing information and customer information.
Click the next button
Open the congratulation window display following:


Congratulations window tells you setup a company in Peachtree software.

Wednesday, 6 March 2013

Opening Microsoft Word Documents


                   Opening Microsoft Word Documents
We'll shortly add an address to the top of our Library Complaint letter. Before we do that, we'll learn how to open a file. After all, you might have closed down Microsoft Word, or your computer might have crashed. The result being that you no longer have your library letter loaded into Word. So here's how to Open a file you have saved, and want to work on again.
From the File menu, click Open:


The Open dialogue box appears, and looks like the image below:

The Open dialogue box looks very similar to the Save As dialogue box. "Save in", "File name", and "Files of type" work in exactly the same way as the Save As dialogue box. Notice, though that the File name text box is blank, and the Open button is not available. It has been grayed out.
The reason that the Open button is greyed out, and therefore not available, is that text box is empty. Once you select a file, the Open button will be ready for us.
But the text box is empty because no file has been selected. A file is selected from the larger white area in the middle. Clicking on the file once with the left hand mouse button will select a file. In the previous image, there was only one file available for selection - a document called "rrKeyCaps.doc". That is not the one we want.
To locate the file we want, we need to open the folder called "My WP Projects". Because that's where we saved it. You can see from the image that this folder is in the list of folders, just below the folder called My Pictures:

You can see also that we are in the folder called My Documents. To open up the folder we want, simply double click it. This will take us inside the My WP Projects:
The whole Open dialogue box now looks like this:
The file we want, Library Letter, has been clicked on. As a result, the Open button is no longer grayed out.We can go ahead and click it. When we do, our letter will open in Microsoft Word.
To recap then on how to open a file. Do the following
· Navigate to the folder where the file was saved
· Click on the file to select it
· Click the Open button